On two separate sites I've recently had to implement a rotating image banner that could optionally be linked to paths within the site or to external URLs. Originally I tried a (mostly) self-contained module that matched the feature set called Rotor with some success but really needed greater flexibility. Undaunted, I rebuilt the functionality using a custom content type, a few CCK fields, ImageCache, and Views with the Views Slideshow plugin.
This tutorial is for Drupal 6 and walks through the exact steps I took to build the slideshow for the relaunch of Biblical Training, including enabling the right modules, creating the content type, defining the ImageCache presets, and building the View.
Hope it helps!
1. Enable the dependent modules.
To get started, you'll need to download and install the modules listed below. It takes quite a few modules to reproduce the feature set of a single module, but building a complex feature from scratch has advantages in flexibility and reusability. Most of these modules are standard "utility" modules on many Drupal sites that can be used for a variety of purposes on your site.
Enable the following modules through the /admin/build/modules form. In the CCK fieldset enable Content, FileField, ImageField, Number, Option Widgets, and Text. In the ImageCache fieldset enable ImageAPI, ImageAPI GD2 (or ImageAPI ImageMagick if your server supports it), ImageCache, and ImageCache UI. In the Other fieldset enable Advanced Help. In the Views fieldset enable Views, Views Slideshow, Views Slideshow: SingleFrame, and Views UI.
2. Create the Banner content type.
Browse to /admin/content/types/add on your site and create a new custom content type with the name set to Banner, the type set to banner, and a meaningful description for your site's administrators. A body field for the banner is unnecessary, so you can expand the Submission form settings fieldset and disable the field by clearing the Body field label textfield. I leave the Workflow settings defaulted as Published and Promote to front page, but you might adjust these depending on the editorial needs for your banner content. Finally, because comments are unnecessary for banners, I set the Default comment setting in the Comment settings fieldset to Disabled.
3. Add the necessary CCK fields.
I use three CCK fields: an image field, a textfield used to collect the link path, and an integer select list used to provide a sort order for banners in the Views. At this point, I'll mention that an alternate method of ordering banners would be to use the NodeQueue module, but it was unnecessary for my use cases.
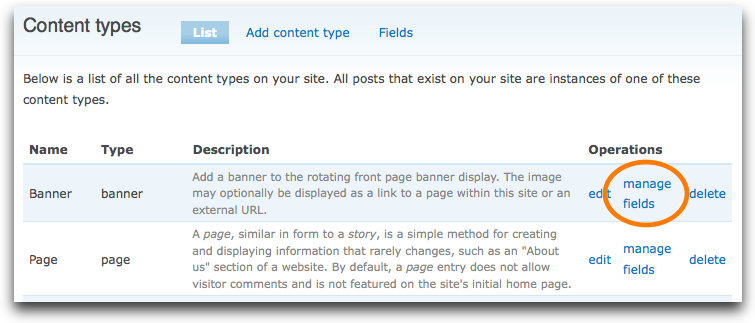
To add the fields, browse to your Banner content type's Manage fields tab using the operations link from the content type list page:

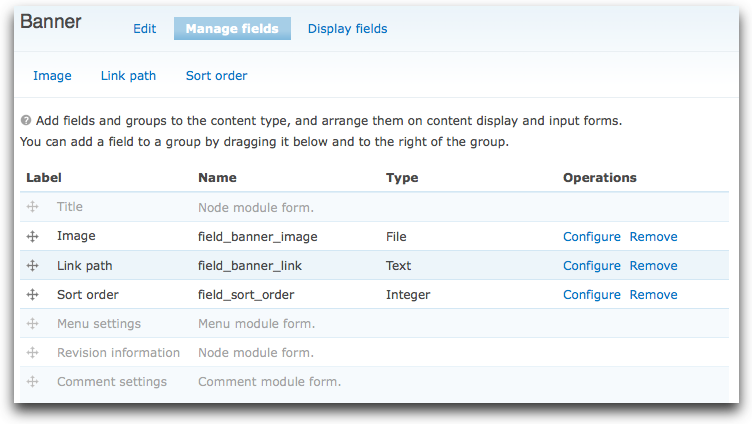
First, add a new field positioned under the title labeled Image with banner_image in the name textfield. The field type should be File and the widget type should be Image. I like to store my banner images in a specific files directory, so I provide a file path in the Path settings fieldset (like banners). I didn't enable ALT text (i.e. what appears if an image does not load), but I did enable Title text (i.e. what appears when you hover the mouse over an image). Last, in the Global settings fieldset I mark this field as required.
Second, add a new field positioned under the image labeled Link path with banner_link in the name textfield. The field type should be Text and the widget type should be Text field. I don't adjust the default settings for the field at all, but you can feel free to require a link path for every banner image or include a help text informing your users to enter a Drupal path or a full URL.
Third, add a new field positioned under the link path labeled Sort order with sort_order in the name textfield. (I don't use a banner specific name for this field because I reuse the sort order field on multiple content types.) The field type should be Integer and the widget type should be Select list. In the Global settings fieldset I mark this field as required. The other settings are tricky. Even though it's more than most sites will reasonably require, I tend to allow a sort order of 1 to 50. So, in the Minimum textfield put 1, in the Maximum textfield put 50, and in the PHP code textarea for the Allowed values setting put the following snippet:
return drupal_map_assoc(range(1, 50));
When you view the fields screen for the content type, it should now look like this:

4. Define a couple of ImageCache presets.
While your site will likely require your banner images to have uniform dimensions, it's not necessary to enforce them on the file upload. Using the ImageCache module, we can define presets that are collections of actions performed to transform an image on display to your desired specifications. These transformed images will be cached in your site's files directory so they don't have to be regenerated each time they're viewed. On my sites, I use one preset for the image as it should appear in my rotating banner and a smaller preset for use in lists. I still recommend to my administrators to attach files to the proper size for the full banner to avoid any scaling or cropping issues.
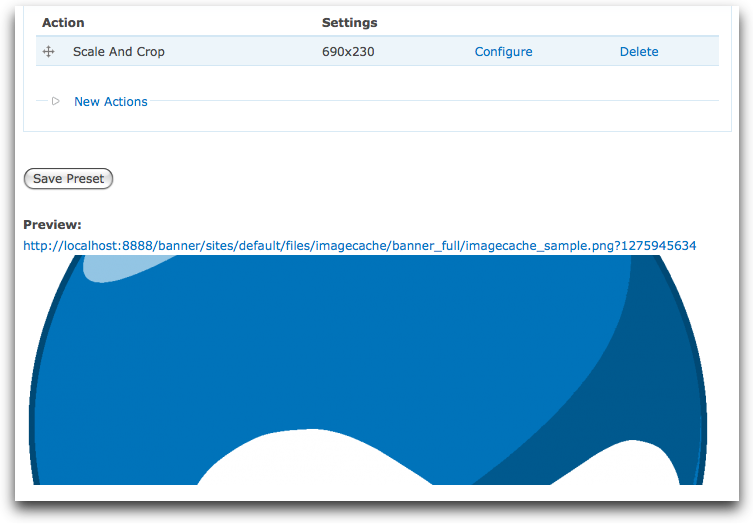
Browse to /admin/build/imagecache/add, enter banner_full as the Preset Namespace, and submit the form. Next click the Add Scale and Crop link and enter the precise pixel width and height the image should be in your rotating banner. For this example, I'm using a pixel width of 690 and height of 230. When you click the Create Action button, you will be returned to the preset's configuration page where you can preview the transformed Druplicon image beneath the form to make sure ImageCache is transforming images properly.

Repeat this process using banner_small as the Preset Namespace and a smaller set of dimensions. I divided by 3 to use a pixel width of 230 and height of 77.
With the ImageCache presets defined, we need to go back and edit the Banner content type to use these for image display. From its edit form, click its Display fields tab. On this form, set the Image field's label to be hidden, its teaser to be banner_small image linked to node, and its full node to be banner_full image linked to image.
5. Create the rotating banner View.
Now that we have a Banner content type defined and the ability to resize its images on display, it's time to create the heart of the rotating banner. Creating Views isn't for the faint of heart, but it's an essential skill for a Drupal site builder or developer. Without explaining Views in too much detail here, I'll simply list the steps to recreate the precise View I use.
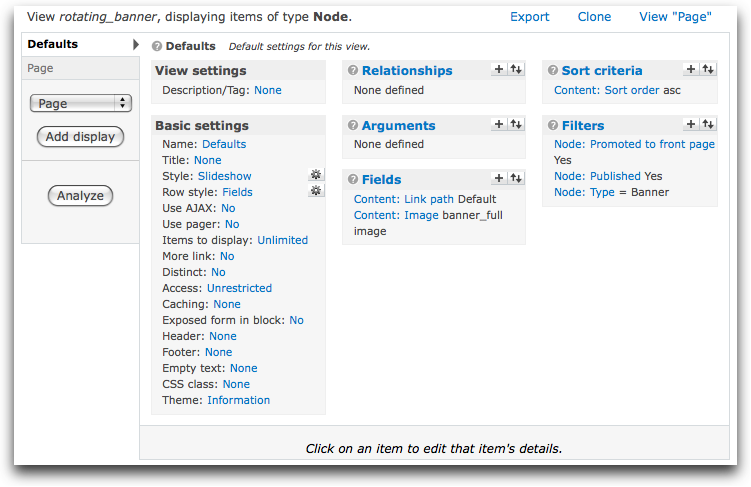
- Browse to /admin/build/views/add and create a new Node View (the default type) with the name rotating_banner.
- Change the style to Slideshow by clicking the Unformatted link next to the Style label in the View's Basic settings. When you do this, it will bring up a second settings form with several options you can adjust dealing with the animation and behavior of the slideshow. For now, it's enough to leave them all to their defaults by just clicking the Update button.
- I don't make any assumptions about how many images the rotating banner should have, even if 10 or more is overkill. Still, I click the 10 link next to the Items to display label and set it to 0 for unlimited.
- Click the + link by the Fields area to add a new field to the View. Scroll down the checkboxes list and check Content: Link path. This field won't actually be displayed, but we need it to be present in the View for use as the link path for the image banner. Simply check the Exclude from display checkbox and click the Update button.
- Click the + to add another field, this time selecting Content: Image. In the settings for the field, check the Output this field as a link checkbox to expand some link settings. In the Link path textfield, put the token [field_banner_link_value]. Further down in the field settings form select the None option in the Label radio buttons. Last, in the Format select list, choose banner_full image and click the Update button.
- Click the + link by the Sort criteria and add Content: Sort order. Leave the settings for the sort order to the default and click the Update button.
- Click the + link by the Filters area and add the following filters all at once: Node: Promoted to front page, Node: Published, and Node: Type. For the promoted and published filters, choose the Yes option. For the node type filter, choose Banner in the Node type select list.
- Last, we just need to add a page display to the View. In the top left of the View edit form locate and click the Add display button beneath the select list with Page already selected. The only thing to adjust on the new display is the path, so click the None link by the Path label in the Page settings area. Enter banner in the textfield and click the Update button.
- Click the Save button beneath the View's settings area. Your View's settings should now look like the following image:

6. Display the View on the front page.
There are several ways to display this View now. The way I've implemented it for my sites, I set the default front page in my Site information settings form at /admin/settings/site-information to the rotating banner page's path, banner. I then added additional content to the front page using blocks.
Depending on the regions in your theme, you might alternately set the front page to something else and use a block display on the View instead of a page display. That's really up to you and how your site is architected.
Whatever you do, once you've set it up, start adding banner images to the site and they should appear. The way the View was setup, only banner images marked as Promoted to the front page will appear. If you're using a rotating banner in multiple places, you might only include that filter on a specific display of the View. Really, what we've done is just a beginning, and there's almost nothing you can't do to customize this for your site.
Comments